School is officially out for the summer, and my kids are home! Having the house full of energy again has me feeling a little nostalgic. A lot has changed in the kids’ wing since we completed the first phase of our home renovation back in 2019—not to mention how much the kids themselves have grown!
With everyone home for the majority of the season, I was inspired to revisit these spaces and share how we designed this zone to handle the beautiful chaos of family life. Whether you’re planning a full remodel or just looking for clever family-friendly design ideas, here is a look at how we made this wing both functional and full of personality.
Flashback to 2019: Here we are right after phase I of our reno was completed. We’re just missing my husband, Scott, and our pup, Oreo.

The Kids’ Hallway: Maximizing Style and Storage
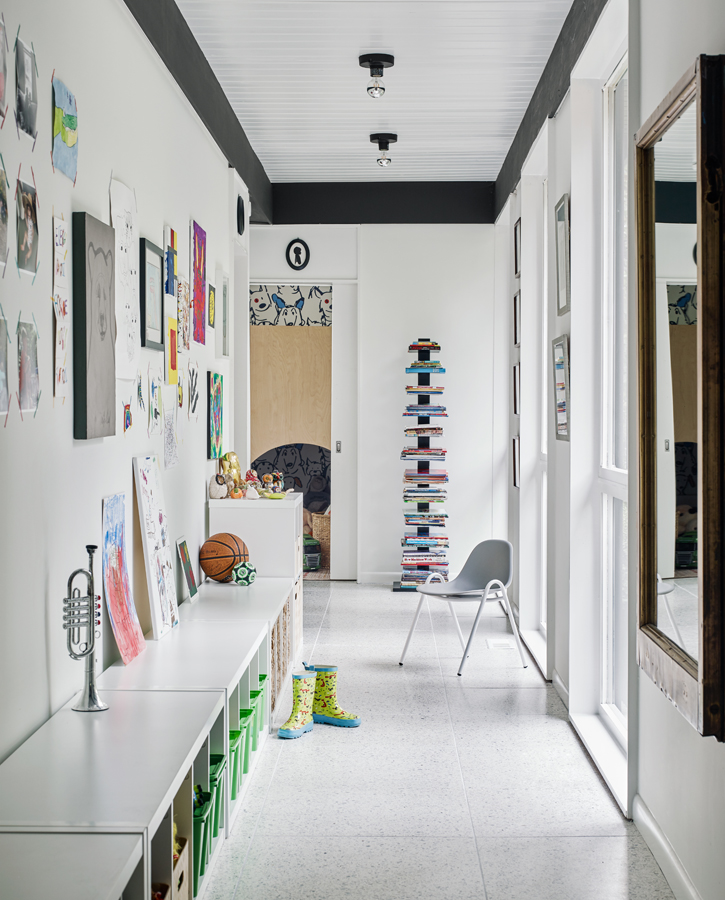
Hallways are so often treated as wasted transition space, but with a busy family, every square inch counts. We wanted the kids’ hall to be both a joyful gallery and a hard-working organizational hub.
- The Custom Gallery Wall: To keep the space deeply personal, we created a massive gallery wall showcasing the kids’ own artwork. It’s a colorful, rotating museum of their creativity.
- Smart Storage Benches: We lined the hallway with a series of IKEA storage cabinets. By banking them together, we created ample hidden storage for toys and shoes, while simultaneously creating a long bench perfect for putting on shoes.
- Natural Light: Large, expansive windows flood the hallway with natural light, making the entire wing feel bright, open, and airy.
The Bedrooms: Built-In Magic on a Budget
While we recently updated both rooms to better suit the “teen and tween” phases (stay tuned for a follow-up blog post on that transformation!), their initial bedroom designs were all about playful, high-functioning creativity.
Bryan’s Room: Playful & Organized

For Bryan’s space, we leaned into a mix of graphic patterns and clever space-saving solutions:
- The Bunk Bed Hack: To maximize floor space, we went with a lofted bed. To elevate it, I added custom plywood panels to a ready-made bunk bed, giving it a high-end, custom built-in look for a fraction of the cost.
- The Walls & Storage: We paired a playful dog-print wallpaper with a utilitarian storage locker closet that keeps clothes and gear organized.
Lucy’s Room: Creative & Whimsical

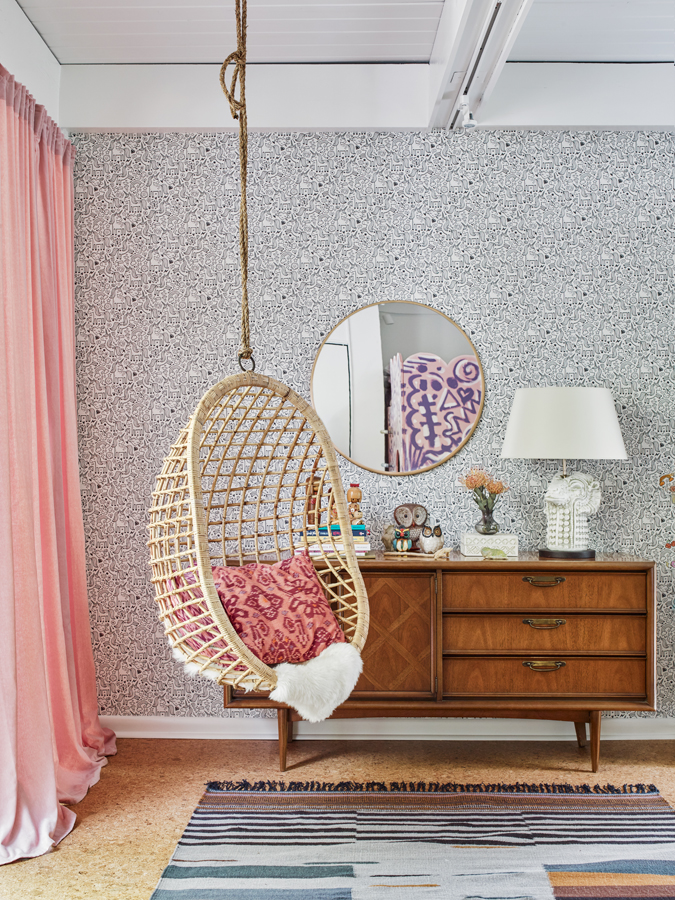
Lucy’s room was designed to spark imagination and withstand a lot of hands-on fun:
- Interactive Wallpaper: We installed a coloring-paper wallpaper that allowed her to literally color on the walls and personalize her own space.
- A Statement Loft: We used the same plywood-panel trick on Lucy’s lofted bed to give it a built-in feel, but finished it with a bold graffiti pattern.
- The Ultimate Hangout: No whimsical kids’ room is complete without a cozy swing chair!
The Kids’ Bath: A Phase 2 Highlight


While the bedrooms and hallway were completed in 2019, we didn’t actually tackle the kids’ bathroom until the second phase of our renovation, completed in 2023. It was high on our priority list, and the wait was absolutely worth it.
- The Hardware: Naturally, I had to bring a piece of my own work into the space! We used Geo pulls from my hardware brand, Nest Studio, to give the cabinetry a sculptural, modern, and playful touch.
- The Tile Statement: We went bold with a stunning, patterned blue-and-white tile from Fireclay Tile throughout the shower. To balance the statement tile, we ran a classic wainscoting tile along the rest of the walls, creating a space that feels fresh, durable, and timeless.
What’s Next?
Looking back at these photos reminds me of how quickly time flies—and how essential it is to design spaces that can evolve alongside your family. As I mentioned, these rooms look a little different today now that we are firmly in the teen/tween era!
Want to see how we updated these exact spaces for older kids? Let me know in the comments below, and I’ll fast-track the follow-up post!